Putting It All Together
Table of Contents
- One Click, From Start to Finish
- Step 1: The Click
- Step 2: Starting the Program
- Step 3: Running
- Step 4: Loading a Page
- Step 5: Pixels on the Screen
- Step 6: Closing the App
- The Whole Series in One Page
- Where to Go Next
1. One Click, From Start to Finish
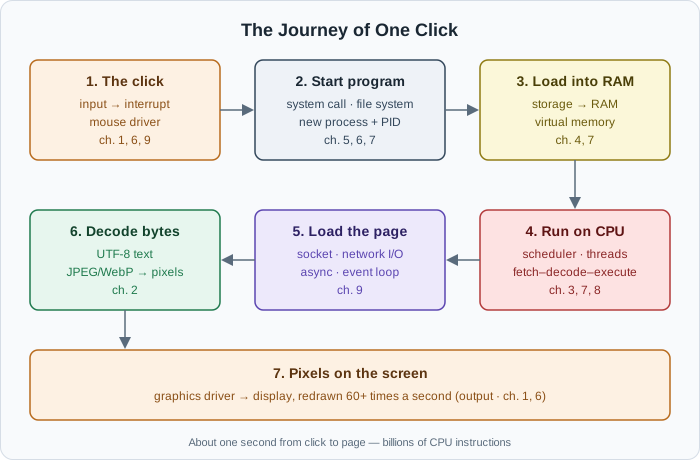
You double-click your web browser, and a moment later a web page appears. It feels like one simple action. In reality, almost every part of the computer you've learned about in this series takes part.
Let's slow it down and follow it all the way through.
2. Step 1: The Click
- You press the mouse button. The mouse sends a signal to the computer — this is input (chapter 1).
- The mouse hardware triggers an interrupt (chapter 9). The CPU pauses what it's doing and runs the mouse driver (chapter 6), which reads the event: "button pressed at this position".
- The kernel passes the event to the process that draws your desktop. That process is a normal user-mode program (chapter 6); it works out that you double-clicked the browser's icon.
3. Step 2: Starting the Program
- The desktop asks the OS to start the browser through a system call (chapter 6).
- The OS finds the browser's program file on disk through the file system (chapter 5), following its path and checking you have permission to run it.
- The OS creates a new process (chapter 7): it assigns a PID, sets up a private virtual memory space, and records the desktop as the parent.
- The program's machine code (chapter 3) is copied from storage into RAM (chapter 4). This step is why apps open faster on an SSD, and faster still the second time, when parts are already cached in RAM.
4. Step 3: Running
- The scheduler (chapter 7) gives the new process's main thread a turn on a CPU core.
- The CPU begins the fetch–decode–execute cycle (chapter 3) on the browser's instructions, pulling data from RAM into the cache and registers as it goes (chapter 4).
- The browser creates more processes — one for each tab and for its helpers — and more threads inside them (chapter 8), so different cores can work in parallel.
- It reads its settings, bookmarks, and history from files on disk (chapter 5) — each read is I/O through a system call (chapter 9).
5. Step 4: Loading a Page
- The browser opens its home page, which lives on another computer. It asks the OS for a network socket (chapter 9) and sends a request.
- This is the slowest part of the whole journey — at the "one second per register" scale from chapter 4, it's years of waiting. So the browser doesn't block. It uses non-blocking I/O and an event loop (chapter 9), keeping the window responsive while it waits.
- When the reply arrives, the network card triggers an interrupt, the driver hands the data to the kernel, and the kernel delivers it to the browser's process.
- The page arrives as bytes (chapter 2): the text is decoded from UTF-8 (so Khmer text appears correctly), and images are decompressed from JPEG or WebP into grids of RGB pixels.
6. Step 5: Pixels on the Screen
- The browser works out where every word, button, and image goes, and produces the final colors for millions of pixels.
- Through the OS and the graphics driver (chapter 6), those pixels are sent to the graphics hardware and then to the display — this is output (chapter 1).
- The screen refreshes typically 60 or more times per second, and the whole loop — input, process, store, output — keeps running for as long as you use the browser.
From your click to a visible page usually takes around a second. In that time, the CPU has run billions of instructions.
7. Step 6: Closing the App
- When you close the window, the browser receives a request to quit — on Linux and macOS, much like a SIGTERM (chapter 7). It saves your open tabs and history to files (chapter 5) before exiting.
- Its processes exit with an exit code of 0 (success).
- The OS reclaims every byte of the processes' RAM, closes their files and network connections, and frees their PIDs.
If the browser had frozen instead, you could Force Quit it — a SIGKILL — and the OS would still clean everything up, but your unsaved tabs, which only existed in RAM (chapter 4), would be lost.
8. The Whole Series in One Page
| Chapter | The one idea to remember |
|---|---|
| 1. What Is a Computer? | A machine that follows simple instructions very fast, built in layers: hardware → OS → apps |
| 2. Bits and Bytes | Everything — text, images, sound, programs — is stored as numbers made of bits |
| 3. The CPU | Fetch, decode, execute, repeat — billions of times a second, on several cores |
| 4. RAM vs. Storage | Close to the CPU is fast and small; far away is slow and large. RAM forgets when the power goes off |
| 5. Files and File Systems | A file is a named chunk of bytes; a path is its address; the extension is just part of the name |
| 6. The Operating System | The kernel manages the hardware; apps ask for help through system calls |
| 7. Processes | A running program, with its own PID and its own isolated memory |
| 8. Threads and Concurrency | Threads share memory inside a process — fast, but watch out for race conditions |
| 9. Input/Output | I/O is slow, so good programs don't sit and wait for it |
| 10. Putting It Together | One click uses every layer, and now you can name each one |
9. Where to Go Next
You now have a mental model of what happens underneath every program you'll ever write. Here's how it connects to what comes next on the Start Here roadmap:
- Command Line Basics — the next step. You'll put files, paths, permissions, processes, and stdin/stdout to work directly from the terminal.
- How the Web Works and Networking for Developers — what happens to that network request after it leaves your computer.
- Math for Programmers — the binary and hexadecimal arithmetic behind chapter 2.
- JavaScript & TypeScript Fundamentals — async code and the event loop from chapter 9, in real depth.
- Docker CLI Tutorial — containers are isolated processes sharing one Linux kernel. After this series, that sentence should make sense.
The next time your app is slow, crashes with "out of memory", or freezes, you won't be guessing — you'll know which part of the machine to look at.
Buy Me a Coffee
Found this tutorial helpful? Consider buying me a coffee to support more free content!