OAuth 2.0 / OpenID Connect Flow
ជំពូកនេះមិនទាន់ត្រូវបានបកប្រែជាភាសាខ្មែរនៅឡើយទេ — សូមអានជាភាសាអង់គ្លេសខាងក្រោម។
Table of Contents
- The Authorization Code Flow, Step by Step
- Why the App Never Sees the Password
- Why HTTPS Matters
- Token Expiration
- Client Credentials Flow
- Which Flow, When
- Beginner Pitfalls
This is the most important concept in the whole crash course — everything in Part 6 and Part 7 is downstream of understanding this flow.
1. The Authorization Code Flow, Step by Step
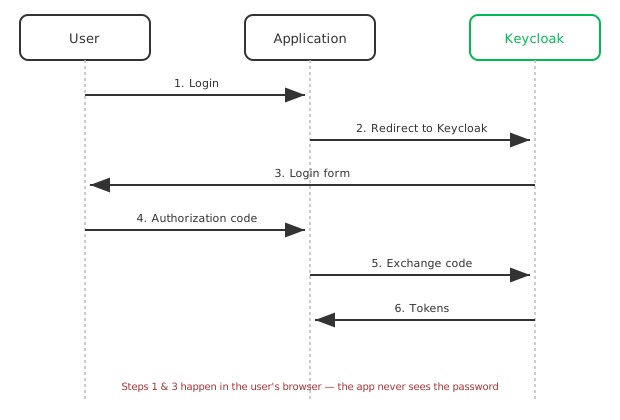
- Login — the user clicks "Log in" in the application
- Redirect — the application redirects the browser to Keycloak, including its client ID and a redirect URI (from Part 4)
- Login form — Keycloak shows its own login page and authenticates the user directly — the application is not involved in this step at all
- Authorization code — Keycloak redirects the browser back to the application's redirect URI, with a short-lived, single-use authorization code attached
- Exchange code — the application sends that code to Keycloak's token endpoint, server-to-server, to exchange it for tokens
- Tokens — Keycloak returns the access token, refresh token, and ID token from Part 2
2. Why the App Never Sees the Password
Step 3 happens entirely on Keycloak's own login page, inside the user's browser — the application's code is never handed the username or password, only redirected away and later handed back a code. This is the entire point of the flow: the application proves it can reach Keycloak's token endpoint, without ever touching the user's credentials.
3. Why HTTPS Matters
The authorization code (step 4) and the tokens (step 6) both travel
through the browser's redirect chain and network requests. Without
HTTPS, a code or token in transit is plaintext — anyone on the network
path can read and reuse it. start-dev mode (from
Part 3)
relaxes this for local development only; a real deployment must run
behind HTTPS.
4. Token Expiration
Access tokens are deliberately short-lived (Keycloak's default is 5 minutes) — if one leaks, the exposure window is small. The refresh token (longer-lived) lets the application silently get a new access token without forcing the user to log in again. This is why Part 2 separates the two: one is handed to every API call, the other is only ever sent back to Keycloak.
5. Client Credentials Flow
Not every caller is a human. The Client Credentials flow skips the user entirely — a client authenticates with its own client ID and secret directly against the token endpoint and gets back an access token representing the application itself, not a user.
curl -X POST http://localhost:8080/realms/crash-course/protocol/openid-connect/token \
  -d grant_type=client_credentials \
  -d client_id=<confidential-client-id> \
  -d client_secret=<client-secret>
This needs a confidential client (see Part 2) — a public client has no secret to authenticate with.
6. Which Flow, When
| Flow | Who's involved | Use case |
|---|---|---|
| Authorization Code | A human user, in a browser | Frontends, mobile apps — anywhere a person logs in |
| Client Credentials | No human — service to service | Backend job talking to another backend API |
Part 7's
demo uses a third option — the password grant — purely as a
curl-friendly shortcut to get a real token without standing up a
frontend; it is explained there as a demo convenience, not a flow to use
in production.
7. Beginner Pitfalls
- Thinking the access token comes back in step 4. Step 4 only returns a code — the code is exchanged for tokens separately in step 5/6. Confusing the two is the most common source of confusion with this flow.
- Reusing an authorization code. It's single-use by design — Keycloak rejects a second exchange attempt with the same code.
- Trying Client Credentials with a public client. It has no secret, so there's nothing to authenticate the request with — Keycloak will reject it.
Official docs:
ទិញកាហ្វេជូនខ្ញុំ
ចូលចិត្តមេរៀននេះមែនទេ? សូមពិចារណាទិញកាហ្វេជូនខ្ញុំមួយកែវ ដើម្បីគាំទ្រការបង្កើតមាតិកាឥតគិតថ្លៃបន្ថែមទៀត!