Creating a User & Client
ជំពូកនេះមិនទាន់ត្រូវបានបកប្រែជាភាសាខ្មែរនៅឡើយទេ — សូមអានជាភាសាអង់គ្លេសខាងក្រោម។
Table of Contents
- Create a Realm Role
- Create a Test User
- Log In as the User
- Create a Client
- Why Redirect URIs Matter
- The Flow We Just Set Up
- Beginner Pitfalls
Working inside the crash-course realm created in
Part 3.
1. Create a Realm Role
Create the two roles Part 6 and Part 7 depend on, under Realm roles → Create role:
useradmin
2. Create a Test User
Under Users → Create new user:
- Username:
meng - Leave email unset — not needed for this crash course
- Create
- Open the new user, go to the Credentials tab → Set password
- Enter a password, and toggle Temporary off
Note: a temporary password forces the user to set a new one on their next login — useful for admin-created accounts in real projects, but it adds a step we don't need for a demo user.
Then go to Role mapping → Assign role, and assign the user realm
role created in §1.
Repeat this once more for a second user, admin, assigning it the
admin role instead — this pair (meng / user, admin / admin) is
exactly what
Part 7's
role-protected route demonstrates against.
3. Log In as the User
Keycloak gives every realm an Account Console where a user can
manage their own login — open
http://localhost:8080/realms/crash-course/account, and log in as
meng to confirm the account works before moving on.
4. Create a Client
Under Clients → Create client:
- Client type:
OpenID Connect - Client ID:
nestjs-api - Next — Client authentication: Off (this makes it a public client, see Part 2) — simplest for a course demo with no server-side secret to protect
- Leave Standard flow (Authorization Code) enabled
- Next — Valid redirect URIs:
http://localhost:3000/* - Web origins:
http://localhost:3000 - Save
Note: Part 7's demo fetches tokens directly via
curlrather than a real frontend redirect, so redirect URIs won't matter in practice for this crash course — but every real client needs them set correctly, so it's worth configuring properly here.
5. Why Redirect URIs Matter
Valid redirect URIs is a safelist: after login, Keycloak will only redirect the browser back to a URI on this list. Without it, anyone could register a malicious redirect URI and trick Keycloak into handing an authorization code (see Part 5) to the wrong place. Web origins is the matching CORS safelist, for browser-based apps calling Keycloak's endpoints directly from JavaScript.
6. The Flow We Just Set Up
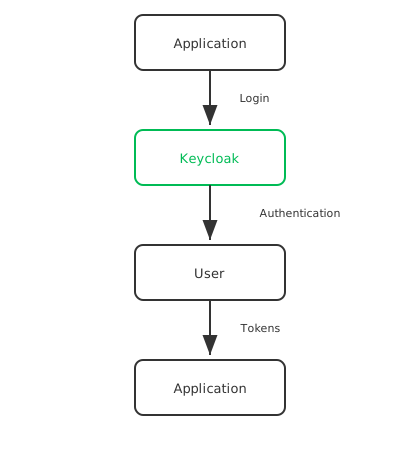
- Application redirects the browser to Keycloak to log in
- Keycloak authenticates the user against the credentials created in §2
- Tokens flow back to the application once login succeeds
Part 5 breaks this exact diagram into its full step-by-step protocol.
7. Beginner Pitfalls
- Turning on Client authentication for a demo client. That makes it a confidential client, which then requires a client secret on every token request — unnecessary complexity for this crash course's public, browser/CLI-style client.
- Leaving Temporary password on, then being confused when a login script fails because Keycloak is demanding a password reset.
- Typo'd redirect URI.
http://localhost:3000(no/*) will reject every redirect that includes a path — always confirm the wildcard is there for local development.
Official docs:
ទិញកាហ្វេជូនខ្ញុំ
ចូលចិត្តមេរៀននេះមែនទេ? សូមពិចារណាទិញកាហ្វេជូនខ្ញុំមួយកែវ ដើម្បីគាំទ្រការបង្កើតមាតិកាឥតគិតថ្លៃបន្ថែមទៀត!